JSR 223
Here is an extract describing this topic :
Servlet specification (Servlet 2.4, JSR-154, is the latest version) defines the set of core abstractions that are used by Java developer writing Web Applications. These abstractions include those of Web Application context, session, request, response, etc. When Java developers write Web Applications, they write classes that interact with these objects in well defined security, resource and class loader contexts. The proposed specification will describe which of these Java objects will be exposed to pages written in other scripting languages. The specification will be grounded on at least one concrete scripting language example, PHP, but the concepts will remain independent of the scripting language and, if at all possible, the EG will also explore the bindings to at least another scripting language. The EG will also explore the case where the Java objects may not be associated with a specific Web application but may just be instantiated in a Java Virtual Machine.
The specification may include a Java API that can be used, possibly through JNI, by an scripting language engine to access the desired Java objects.
This specification will describe how it is possible to bundle scripting pages into a WAR file, either stand-alone, or as part of an EAR. The specification will describe the different implications for security, resource, and class loader contexts both in the case of stand-alone WARs and as part of an EAR. The EG will also consider whether it is appropriate to deliver scripting and Java code outside of a WAR.
The specification may describe how scripting pages can be denoted as such in a WAR in a manner that is easily identified using only the machinery in any standard Servlet container. For instance, it may be appropriate to define a standard Servlet per scripting language; this would allow a WAR to indicate in its web.xml descriptor which files are in a given scripting language. The EG may decide that a container that follows this JSR can use a different mechanism, like a default extension value, to determine that a page is an scripting language known to the container.
 Starting in groovy version 2.1.4 and later, we have this additional scripting language extension feature offered for the java and groovy community. This feature is only available for users with installed java JVM versions 1.6+ so if, like me, you’re still running jdk 1.5, we’re out of luck.
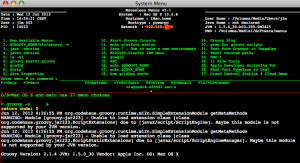
Jun 12, 2013 4:26:55 PM org.codehaus.groovy.runtime.m12n.SimpleExtensionModule getMetaMethods
WARNING: Module [groovy-jsr223] - Unable to load extension class [class org.codehaus.groovy.jsr223.ScriptExtensions] due to [javax/script/ScriptEngine].
Maybe this module is not supported by your JVM version.

Jun 12, 2013 4:26:55 PM org.codehaus.groovy.runtime.m12n.SimpleExtensionModule getMetaMethods WARNING: Module [groovy-jsr223] - Unable to load extension class [class org.codehaus.groovy.jsr223.ScriptStaticExtensions] due to [javax/script/ScriptEngineManager]. Maybe this module is not supported by your JVM version.
Groovy Version: 2.1.4 JVM: 1.5.0_30 Vendor: Apple Inc. OS: Mac OS X
This script extension defines new Java 6 specific groovy methods, so look here for more details :http://groovy.codehaus.org/api/org/codehaus/groovy/jsr223/ScriptExtensions.html
P.S.
What i really meant to say is that your installed version of the java jdk is too old to be able to run the extra new logic that comes with later versions of groovy. Update your installed JDK to jdk 1.6 or later to be able to use these new extensions – thx.