Cherokee Web Server – Part 5 – How To Update in Ubuntu 11.04

The final part of this saga follows as I forgot to tell you about the issues in upgrading a Cherokee version, if you have already had a prior version installed. You read in a previous post how there might be an artifact in the sources.list pointing to an older PPA archive for Cherokee. In that file, it was necessary to remove the DEB and DEB-SRC entries for the Cherokee PPA.

Another issue arose when clicking the Apply button in Synaptic. This was a report of a conflict between the existing /etc/apt/cherokee.conf and a new version that was to be installed for version 1.2.98. I was given a choice to keep the existing version or replace the existing version. So before taking that choice, pulled up a terminal session, changed directories to /etc/cherokee and did a

sudo mv cherokee.conf cherokee.conf.bak

to preserve my old settings. Needed to be root to get over the security bits. Then click the
replace button to do the deed.

I’m going to ‘diff’ the two versions and report back to you when the differences can be identified. I’m rather sure that these differences relate to the server and vserver entries created in the existing version as now under 1.2.98, Cherokee does not ‘see’ any of those settings, so conclude this .conf file has those settings. More later.

Cherokee Web Server – Part 4 – How To Update in Ubuntu 11.04

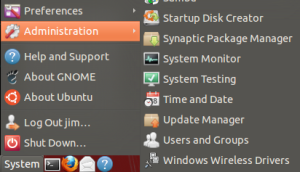
Now we have our repositories updated and upgraded, we can use a friendly GUI like Synaptic package manager. Find it here under System > Administration > Synaptic Package Manager then click that.

Synaptic Package Manager
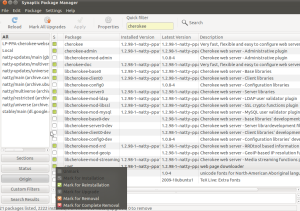
Cherokee Modules Available in Synaptic Package Manager

The screenshot below is how mine looked after the upgrade. Cherokee was used in the search box to choose only those components used by Cherokee.

This screenshot (click to grow) was taken after the upgrade so it shows the installed version of Cherokee modules as 1.2.98 though before the upgrade, it showed version 1.2.2. I could then right click on each module to pull up the ‘Mark’ menu.

At that point ‘Mark for Upgrade’ was an active choice shown in white text. Just clicked it to mark for upgrade on each cherokee module with a green box. Clicked the ‘Apply’ checkmark at the top of the screen and since this system had an active internet connection, synaptic found the correct cherokee PPA repository and downloaded the marked modules.


Then to check the status of Cherokee :

/etc/init.d/cherokee status

to review the server status, and since mine was not running, i had to key:

/etc/init.d/cherokee start

then from a browser address bar to confirm Cherokee was happy, I typed:

http://localhost/about

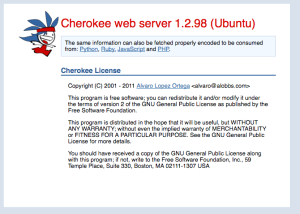
to see something like this Cherokee web server 1.2.98 display which gives us a confirmation that cherokee has been successfully upgraded to this later version :

Cherokee /About Confirmation Page

Now one last piece of this puzzle will be revealed in part five of this series.

Cherokee Web Server – Part 3 – How To Update in Ubuntu 11.04

During a review of my systems, i noticed that after i upgraded my sony 512Mb system to ubuntu 11.04, it did not have the punch i expected from the move from 10.10 and i put this down to more things happening in 11.04 than before. So i started to use Lubuntu as a more light-weight environment for my old sony as it is just a spare box we can test on. There are a choice of desktop environments when you first boot ubuntu. On the log on screen, at the bottom left, is a drop-down panel offering several desktops to choose from during boot time. I liked XFCE a lot but decided to use Lubuntu as it seemed nippy-er and looked nicer – a subjective opinion if ever there was one. 🙂

But for all that, the poor performance continued and had to look for other reasons. One problem i had when using XFCE or Lubuntu was that i could not use chicken-vnc from my Apple iMac PPC to control the sony (which has a busted keyboard and screen), so i had to forget about Lubuntu and fall-back to Gnome. I can VNC into my sony using the Gnome desktop and it works ok, but not quick.

So what else could be eating my system ? Opening a terminal, and doing a ‘ps -e’ command, there were a number of things running that i really don’t need. Update-notifier was killable as i do that often myself and on such a small system, the unexpected performance hit is unwelcome. The update manager peeks at the Ubuntu repositories every so often. So i did a ‘kill -9 1662’ cos that was it’s job number.

There was also a copy of mysql daemon running as well. Now you may remember that mysql is a database server and eats a lot of resource, so to kill that we can use the ‘service’ command to stop it.

sudo service mysql stop

Did you ever look at the swappiness value for your system ? https://help.ubuntu.com/community/SwapFaq gives us a way to look at how ubuntu uses the swap partition or swap file that’s created when we first install ubuntu. From their page, we find :

  • swappiness can have a value of between 0 and 100
  • swappiness=0 tells the kernel to avoid swapping processes out of physical memory for as long as possible
  • swappiness=100 tells the kernel to aggressively swap processes out of physical memory and move them to swap cache

cat /proc/sys/vm/swappiness
vm.swappiness=60

That was what the original install used, so i followed the above SwapFaq to change mine to zero to keep more in memory and use swap less. Subjectively, it does seem better but that could be my imagination. 🙂

Then i noticed that my old friend was still running apache2 as a web server and tomcat 6 for web services. Ouch !

Had to look up my own notes to install Cherokee. See part 1 here and part 2 here. Fortunately, i’d left myself enough hints as to how this goes when we need to install/update Cherokee. It required stopping both tomcat and apache web server.

/etc/init.d/tomcat6 stop
/etc/init.d/apache2 stop

Then to check the status of Cherokee :

/etc/init.d/cherokee status

to review the server status, and since mine was not running, i had to key:

/etc/init.d/cherokee start

then from a browser address bar to confirm Cherokee was happy, I typed:

http://localhost/about

to see something like this display below right. Of course, mine did not say 1.2.98 as the version. It had version 1.2.2, which is rather old. So it looked like an upgrade was also over-due for Cherokee. Looking back at my notes, this was going to need a change in the ubuntu sources file that identifies non-ubuntu personal package archives, or PPA’s for short.

Cherokee software sits on the Launchpad site located here and you should see something like this. In this pix below, is a red line around the most recent version of Cherokee. Notice that it says ‘natty’ which is the name for ubuntu 11.04, so this is the one i picked. You may need to do other reading about PPA security keys and the like. Anyway, this is what it takes to upgrade Cherokee to the next version.

PPA for Cherokee Web Server - Ubuntu 11.04

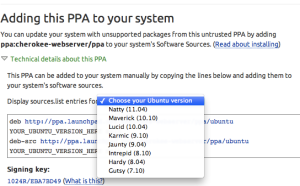
Ok, now have a look at the PPA screenshot below right to see Display sources.list entries for: which has a drop down next to it. Click there to reveal your choices as to which flavor of ubuntu you have. Why do that ? Well, when you click a choice the deb and deb-src entries in the text box are adjusted to the values we’ll need next.

PPA Choice of Ubuntu Flavor

So after clicking my choice of natty, the text box looked like this. Then copied that text to my clipboard to update the ubuntu sources.list of repositories.

PPA DEB Choices
PPA DEB Choices

Click on this image to see a bigger version.

Here is a link to more ideas about updating ubuntu repositories. I generally use the Synaptic package manager GUI for these things rather than apt-get. But look here: https://help.ubuntu.com/community/Repositories/CommandLine for more info. A terminal command line like this could be used too:

sudo gedit /etc/apt/sources.list

Now copy the deb text from your clipboard into the sources.list file and save it. You might also need to review your version to see if the PPA for cherokee has already been declared before. If so, remove the deb and deb-src for those before saving your new sources.list file.

sudo apt-get update
sudo apt-get upgrade

To download new and revised versions of software for your system, these commands should now do it. More info on apt-get here. Read part four of this series to continue this upgrade.

In Preparation for Ubuntu 11.04

Thought i had learned my lesson last time when ubuntu 10.10 was released and i foolishly burned a CD to install on my favorite old laptop which already had a wonderfully working copy of Ubuntu 9.04. Doncha know it buggered the heck out of my pcmcia wireless connection and i have never been able to get it back to working shape again. Well i have 6 boxes here so it was only just a spare baby for tinkering around. Still miffed me a bit, so i thought i’d wait for release of 11.04 and do a fresh install.

As the sailor said to the lady on the street corner, the time has arrived for us to get down to business.

  1. Power on sacrificial laptop
  2. Take a FULL backup, and i mean every bit and byte
  3. Go here :http://www.ubuntu.com/download/ubuntu/download
  4. Decide on which flavor you like depending on the particular hardware you have. This will normally be either for an AMD chipset or for an Intel chipset. Look for a sticker on the outside or underside of the machine. If all else fails, read the manual. I do this once in a great while, cos i think i know it all and am too busy to be bothered at which point the blue smoke rolling out of the back of the box gives me pause for thought, that perhaps moi has made la boo-boo (again).
  5. The last time i burned a CD, i forgot to verify that it had downloaded correctly. This can be done by running a little utility program that counts up all the little bits and bytes and printouts out what is called a check-sum, which is short for check-sum – a summary total  that you can match against what Ubuntu people say they put out there. Look here: https://help.ubuntu.com/community/UbuntuHashes for a hash code value for your chosen variety of ubuntu.
  6. On my iMac, this terminal command was used to checksum the Ubuntu 11.04 .ISO for Intel systems:
RedApple:~ jim$ md5 /Users/jim/Downloads/ubuntu-11.04-desktop-i386.iso 
MD5 (/Users/jim/Downloads/ubuntu-11.04-desktop-i386.iso) = 8b1085bed498b82ef1485ef19074c281

There is a nice explanation on how to do this on different machines: https://help.ubuntu.com/community/HowToMD5SUM

Ok, so we can assume you’ve done your checksum and can confirm the value of your .ISO file matches the published value ( see above ). Now you’ll need a few tips on how to create a new CD from the .ISO file you just downloaded.

To make a new CD from your Ubuntu download, you don’t really need to waste a DVD as they hold about 4.7 GB of data and the typical Ubuntu download is about 682MB – or small enough to fit onto a single blank CD. Or bulk buy a shrink wrapped box of 10 cheap CD’s cos you’re going to throw them away when the next release comes out, or make coasters or frizzbies out of them so spare the expense and just get a cheapie. That way, if it fails to copy correctly, breaks or otherwise screws-up, you will not be heart-broken. More tips here.

Just another note : more than once, i’ve had a great download, the images seemed fine, it was for the correct Intel chipset, the MD5 check sum value was spot-on, and after burning, the CD just would not play on any of several different machines i have here. So did it all again. Fresh download. Verify download. MD5 check sum. Burn to new blank CD and – zilch. The ONLY way i had success was to burn my ubuntu.iso image at the slowest possible speed known to man or god. Then it worked and i was a happy bunny (again). So a humble suggestion : if you have a choice in the matter, do a slow burn – it may take longer but it’s still quicker than doing the whole routine three times. You have been warned.

I’ve also wanted to try making a bootable USB key, but my kit is so old, Noah used it to count the animals on the Ark, so needless to say it does not have enough smarts in the BIOS to ‘see’ a bootable USB key. You may have a later BIOS, so catch further tips here. Since I’m on a Mac i followed the instructions there to “Launch Disk Utility (Applications → Utilities → Disk Utility)”.

Ok, so i’ve done everything possible to make this a success. The iMac Disk Utility allowed me to burn the .ISO to a CD but failed with a burn error. Do not know if this is because of a faulty burner as i’ve not used it in over a year, a faulty driver, a bad CD, or what. as this is Sunday and i only have a single blank CD left, i’m asking myself,  “do you feel lucky, punk ?”, so shall i try a burn on my wife’s windows 7 kit ? Stay tuned.

On a happier note, my old sony laptop with blitzed keyboard and busted display panel has been doing service in my Cherokee tests under ubuntu 10.10. Since the wireless is still up on that, i decided to try an upgrade to 11.04 using the Start>Administration>Update Manager route just to see what goes pop. After about an hour of grinding (it’s a slow box) it decided that it needed to download about 3,000 new bits totalling 979MB of data, and took off doing do. Decided to let it run overnite and this morning it was waiting for me to make a decision as to whether to overwrite libpam-so, or something close, that is used in glassfishV3, so i said yes. I do have a few older backups, so will now hit the pause button, while i do a complete backup of that system prior to it blowing it’s brains out, or if super-lucky, a shiny new upgrade. I’m thinking the wireless will be blitzed, so that would make 2 wireless ubntu systems that are truly wireless :{

I generally tend to take the default of ‘yes’ when asked do ya wanna overwrite this current version with this newer version ? I can always do a full rebuild, but this is my only windows system left with a windows xp partition, so am reluctant to blitz the whole thing just now. It is still chunterring along quite nicely so off for a cuppa till backups are done. More anon…

Woops! “Could not install samba4 so it may not be in a working state.” Ok, so will take note of that and try to sort it out post-install. “Do you want to report this issue to the developers?” – Yes.

“The Upgrade has aborted. Your system could be in an unstable state. Resetting system using DPKG”. THEN, “The Upgrade has completed but there were errors”. Ok, so now i ask myself, is my system back to the way it was before i started the upgrade, or is it all ok, except for samba4 ? System did not restart but i still have internet. If i reboot now, will it blitz everything ? Will hang fire here till i figure out a plan of action.

LATER –  Decided to reboot the sony to see wot will work et voilà, a shiny new 11.04 awaits my pleasure. It did tell me that there was no graphics hardware to run Unity desktop, which is no miss for me as i never wanted it. So whoa! Wireless internet still works and my Cherokee service and java and groovy pieces remain in tact.  Did not even need to rebuild the disk partitions! Who’s a happy bunny now ?

BACK TO the saga of the 11.04 .iso CD  that would not burn. Did a fresh download and md5 checksum on another ubuntu 11.04 using a windows 7 system – gag 😛  but at least i can right-click mouse on my 11.04.iso to BURN TO  CD with verify – all of which went ok. Did an eject of CD and tried a boot on my apple macbook intel corpse dynamic-duo  –  naw 😛  did not like it – even tried several times. Mac can “see” the CD and browse but will not boot. 😛

Scratch head……. look for a Coors … hhhmmmm….

Forgot to read this apple advisory on using shortcut keys when booting: http://support.apple.com/kb/ht1343

ok, so ejected Cd, re-inserted Cd,then did a reboot while pressing key ‘C’ only on MacBook and voila, Houston, we have lift off. After several minutes of tinkering, the wireless internet came up. I played with the new ubuntu Unity interface for a bit but cannot say that I like it all that much. Perhaps it grows on you after a while, like mushrooms or toejam but did not have a lot of time to play. Know that on my old machines i shall be using lubuntu to void resource hogging. So that’s how i did it. Hope this helps you a bit.   😀